
Experiencing a MacBook Pro that won’t turn on can be troubling, but it’s a more common issue than you might think. Whether you’re facing a blank screen or a non-responsive power button, the issue resolvable. There could be several reasons due to which your MacBook Pro won’t turn on. Some of the common issues that are worth mentioning are dead battery, faulty power adapters, display issues, external device interference, RAM or Hardware issues, corrupted software, etc. The good news is, that there’s usually a solution at hand, and fixing it can be simple once you know how to do it.
Easy Steps to Fix a MacBook Pro that Won’t Turn On
Follow these straightforward steps to diagnose and potentially resolve the issue with ease. From checking power connections to performing a power cycle and beyond, we’ll guide you through each step, ensuring you can tackle the problem confidently. Whether it’s a hardware glitch or a software hiccup, you’ll find solutions to get your MacBook Pro back up and running smoothly. Read on to discover how simple it can be to troubleshoot your device and overcome the challenge of a non-responsive MacBook Pro.
Step 1: Check Power Connections
Ensuring your MacBook Pro is properly connected to a power source is a fundamental step. It addresses the most basic reason a device might not start – lack of power.
- Inspect the Power Adapter and Cable: Examine the adapter and cable for any visible damage or wear. This includes fraying, cuts, or kinks in the cable.
- Ensure Correct Adapter: Confirm you’re using the correct power adapter for your specific MacBook Pro model. Using an incorrect adapter can lead to insufficient power supply. For example, MagSafe 1 Charger 60w is compatible with MacBook Pros built before mid-2012.
- Check the Connection: Ensure the power adapter is securely connected to both the MacBook Pro and the power outlet. Loose connections can prevent charging.
- Test the Power Outlet: Verify the power outlet’s functionality by plugging in a different device. This helps rule out issues with the power source itself.
- Check Indicator Light: If your adapter has an indicator light, observe its color and behavior. It can provide clues about the charging status and connection quality.
Step 2: Check for Signs of Power
Observing indicators like lights or sounds helps you determine if the MacBook Pro is receiving power but not turning on, which can indicate specific types of issues.
- Look for the Power Indicator: If your MacBook Pro has a power indicator, observe its status. A light, either green or amber, indicates that power is reaching the device.
- Listen for Startup Sounds: Power on your MacBook Pro and listen for any startup sounds, like chimes, which indicate that the MacBook is receiving power.
- Check for Fan Noise or Heat: Feel for any warmth or listen for fan noise from your MacBook, as these can be signs that it’s receiving power but not displaying anything.
- Observe the Screen: When you attempt to turn on your MacBook Pro, look for any flickers or changes in the screen, even if it remains mostly black.
Step 3: Perform a Power Cycle
Power cycling can resolve issues related to temporary software or hardware glitches by completely resetting the power state of your MacBook Pro.
- Disconnect all External Devices: Unplug any external devices connected to your MacBook Pro, including USB devices, external displays, and chargers.
- Power Down: If your MacBook Pro is on, shut it down normally via the Apple menu.
- Drain Residual Power: Once it’s off, press and hold the power button for about 10 seconds. This step helps to discharge any residual power in the system.
- Reconnect Power Source: Reconnect the power adapter to your MacBook Pro.
- Power On: Try turning on your MacBook Pro by pressing the power button as usual.
Step 4: Check your Mac Display
Checking the display is crucial, as the issue might be the screen itself and not the MacBook Pro. It helps in differentiating between display issues and other hardware or software problems.
- Power On and Observe: Turn on your MacBook Pro and closely observe the screen. Look for any flickers, colors, or movement.
- Adjust Brightness: Try adjusting the brightness using the keyboard controls. Sometimes the screen might be on but set to the lowest brightness.
- Check for External Display: Connect an external monitor to see if the issue is with the MacBook’s screen or the system itself.
- Listen for Sounds: Pay attention to startup sounds or other operational noises that indicate the MacBook is working, even if the display isn’t.
Step 5: Reset the SMC
Resetting the SMC (System Management Controller) on your MacBook Pro can be done in a few steps. The exact method depends on whether your MacBook Pro has a T2 Security Chip. MacBook Pros with Intel processors released after 2018 have T2 chips.
For Models with a T2 Chip:
- Shut down your MacBook Pro.
- Press and hold the following keys: Control (left side) + Option (left side) + Shift (right side). Hold these keys for 7 seconds.
- While holding these keys, press and hold the power button for another 7 seconds.
- Release all keys, wait a few seconds, then restart the MacBook Pro.
For Models without a T2 Chip:
- Shut down the MacBook Pro.
- Press the Shift (left side) + Control (left side) + Option (left side) keys and the power button simultaneously.
- Hold these keys and the power button for 10 seconds.
- Release all keys and then turn on the MacBook Pro
At times, there are situations where the issue is not hardware-related but instead is due to the software. If the previous steps do not provide you with a permanent fix and you still suffer from your MacBook not turning on, then these next steps can help you identify in case these problems are related to the MacOS.
Step 6: Boot in Safe Mode
Booting in Safe Mode lets you start your MacBook Pro with minimal system files. It’s a way to troubleshoot if software or applications are causing the problem.
For Intel-based Macs:
- Restart your Mac: Begin by restarting your MacBook Pro.
- Hold the Shift Key: Immediately press and hold the Shift key as your Mac restarts. This key should be held down as soon as possible after the restart begins.
- Release the Shift Key: Once the login window appears, release the Shift key. Your Mac should now be in Safe Mode.
For Apple Silicon Macs (M1 or later):
- Power Off and Restart: Turn off your MacBook Pro. Then, press and hold the power button to restart it.
- Access Startup Options: Continue holding the power button until the startup options window appears.
- Activate Safe Mode: Select your startup disk, then press and hold the Shift key while clicking “Continue in Safe Mode.” Release the Shift key after clicking.
Verifying Safe Mode:
- Check Boot Mode: Once logged in, hold the Option key and choose the Apple menu > System Information.
- Navigate to Software: In the System Information app, select “Software.”
- Confirm Safe Mode: Look for the value next to “Boot Mode“. If it says “Safe“, your Mac is in Safe Mode.
Step 7: Start Your Mac Using Another Account
To start your Mac use another account in a more detailed step-by-step approach. By logging into a different user account, you can determine if the issue is specific to one user’s settings or a system-wide problem.
- Access the Login Screen: Restart your MacBook Pro and wait for the login screen to appear.
- Switch User Accounts: If you’re automatically logged into a default account, log out to return to the main login screen.
- Select Another Account: On the login screen, choose another user account that you have access to. If you don’t have another account, you can create a new one from the system preferences if you have administrative privileges.
- Login and Test: Enter the password for the selected account and log in. Check if the MacBook Pro operates normally under this account.
Step 8: Using Recovery Mode
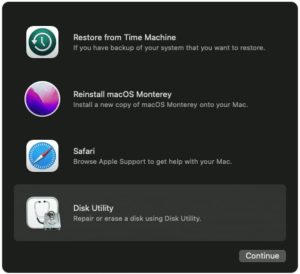
Recovery Mode is essential for diagnosing and fixing disk or system issues and for performing tasks like restoring from a Time Machine backup, which can be crucial for more serious system problems.
- Enter Recovery Mode: Restart your MacBook. For Intel-based Macs, hold down Command + R during startup. For Apple Silicon Macs, press and hold the power button until you see startup options, then choose Options > Continue.
- Access Utilities: In Recovery Mode, select “Utilities” from the menu bar.
- Run Disk Utility: Click on “Disk Utility” and select your Mac’s drive (usually named “Macintosh HD”).
- Perform First Aid: Click on “First Aid” Disk Utility will check the disk for errors and repair them automatically. If issues are found, you may need to click “Repair Disk“
- Consider Additional Recovery Options: From Recovery Mode, you can also restore your Mac from a Time Machine backup, or use Target Disk Mode to transfer files between two Macs.
Wrapping up, if your MacBook Pro still doesn’t power on after trying the troubleshooting methods we’ve discussed, and you’ve bought the device from Techable with an active warranty, then you can reach out to us at Techable’s customer support. This could provide you with additional help specific to your situation. However, if you have bought your MacBook Pro from another company, you can contact them. Lastly, if you’re considering selling your MacBook, whether it’s due to unresolved issues or a desire to upgrade, SellMac offers a straightforward platform to facilitate this process.
Leave a Reply